在本教程中,我们将向您展示如何在 CentOS 7 上安装 Caddy Web 服务器。对于那些不知道的人,Caddy Web 服务器是一个用 Go 编写的开源且注重安全的 Web 服务器。 Caddy 包括现代功能,例如对虚拟主机的支持、静态文件的缩小和 HTTP/2。
本文假设您至少具备 Linux 的基本知识,知道如何使用 shell,最重要的是,您将网站托管在自己的 VPS 上。 安装非常简单,假设您在 root 帐户下运行,如果不是,您可能需要添加 ‘sudo‘ 到命令以获取 root 权限。 我将向您展示在 CentOS 7 服务器上逐步安装 Caddy Web 服务器。
球童特点
- 自动 HTTPS。
- 易于部署。
- 多核。
- 网络套接字。
- 重写和重定向。
- 虚拟主机。
在 CentOS 7 上安装 Caddy Web 服务器
第 1 步。首先,让我们首先确保您的系统是最新的。
yum clean all yum -y update
步骤 2. 在 CentOS 7 上安装 Caddy Web 服务器。
运行以下命令即可快速轻松地安装 Caddy:
curl https://getcaddy.com | bash
脚本完成后,您可以运行以下命令来查看 Caddy 的二进制文件在哪里:
which caddy
您的输出应如下所示:
/usr/local/bin/caddy
步骤 3. 设置必要的目录。
接下来,创建我们将存储 Caddy 配置文件 Caddyfile 和 SSL 证书的目录:
mkdir /etc/caddy chown -R root:caddy /etc/caddy touch /etc/caddy/Caddyfile mkdir /etc/ssl/caddy chown -R caddy:root /etc/ssl/caddy chmod 0770 /etc/ssl/caddy mkdir /var/www chown caddy:caddy /var/www
步骤 4. 将 Caddy 安装为系统服务。
我们还需要创建一个新的 SystemD 配置脚本:
cd /etc/systemd/system/ nano caddy.service
添加以下行:
[Unit] Description=Caddy HTTP/2 web server Documentation=https://caddyserver.com/docs After=network-online.target Wants=network-online.target systemd-networkd-wait-online.service [Service] Restart=on-failure StartLimitInterval=86400 StartLimitBurst=5 ; User and group the process will run as. User=caddy Group=caddy ; Letsencrypt-issued certificates will be written to this directory. Environment=CADDYPATH=/etc/ssl/caddy ; Always set "-root" to something safe in case it gets forgotten in the Caddyfile. ExecStart=/usr/local/bin/caddy -log stdout -agree=true -conf=/etc/caddy/Caddyfile -root=/var/tmp ExecReload=/bin/kill -USR1 $MAINPID ; Limit the number of file descriptors; see `man systemd.exec` for more limit settings. LimitNOFILE=1048576 ; Unmodified caddy is not expected to use more than that. LimitNPROC=64 ; Use private /tmp and /var/tmp, which are discarded after caddy stops. PrivateTmp=true ; Use a minimal /dev PrivateDevices=true ; Hide /home, /root, and /run/user. Nobody will steal your SSH-keys. ProtectHome=true ; Make /usr, /boot, /etc and possibly some more folders read-only. ProtectSystem=full ; … except /etc/ssl/caddy, because we want Letsencrypt-certificates there. ; This merely retains r/w access rights, it does not add any new. Must still be writable on the host! ReadWriteDirectories=/etc/ssl/caddy ; The following additional security directives only work with systemd v229 or later. ; They further retrict privileges that can be gained by caddy. Uncomment if you like. ; Note that you may have to add capabilities required by any plugins in use. ;CapabilityBoundingSet=CAP_NET_BIND_SERVICE ;AmbientCapabilities=CAP_NET_BIND_SERVICE ;NoNewPrivileges=true [Install] WantedBy=multi-user.target
设置所有者和权限:
chown root:root /etc/systemd/system/caddy.service chmod 644 /etc/systemd/system/caddy.service
最后,执行以下命令使 Caddy 在启动时运行:
systemctl enable caddy systemctl start caddy
步骤 5. 创建测试网页和 Caddyfile。
出于测试目的,我们将创建一个测试 HTML 文件:
mkdir -p /var/www/my-domain.com echo "Caddy" > /var/www/idroot.us/index.html chown -R www-data: /var/www/my-domain.com
接下来,将我们的域添加到 Caddy 配置文件中:
nano /etc/caddy/Caddyfile
添加以下行:
my-domain.com { root /var/www/idroot.us }
Save 文件并退出编辑器。 要应用更改,请重新启动 Caddy:
systemctl restart caddy.service
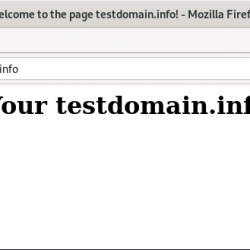
现在,使用网络浏览器,只需转到 https://my-domain.com,您将看到我们的测试页面!
恭喜! 您已成功安装 Caddy。 感谢您使用本教程在 CentOS 7 系统中安装 Caddy Web 服务器。 如需其他帮助或有用信息,我们建议您查看 官方 Caddy 网络服务器网站.